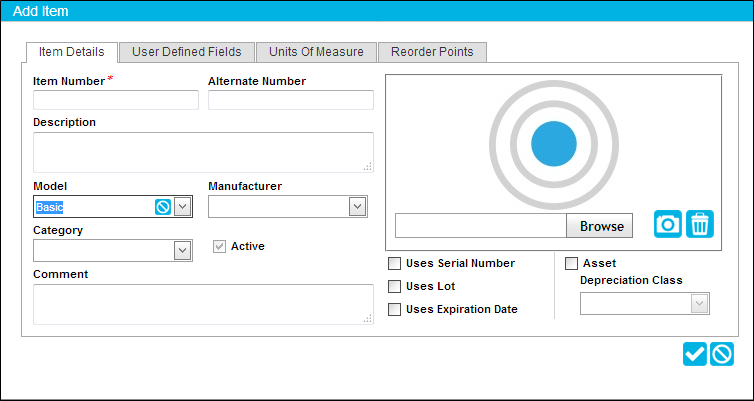
Item Details
The main item information is stored in the Item Details tab. Item Details include:
- Item Number
- Alternate Number
- Description
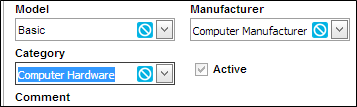
- Item Lookups: Model, Manufacturer, Category
- Active checkbox: this checkbox indicates the active status of the item. It is automatically marked by the system. When marked, the item is considered active; when unmarked the item is considered inactive.
- Comments
- Picture; see "Adding an Item Image".
- Inventory Options: dependent on division-level inventory settings): serial number, lot, expiration date
- Track Cost: dependent on division level option setting, see "Setting Division Options" for more information.
- Asset Option (available only if the role of the logged-in user contains the Assets feature); see "Adding an Asset from the Manage Items Page"
For information about adding item details, refer to the steps that follow.

- Item Number (required): At the Add Item form, enter the Item Number in the Item Number field. (The item number must be unique within a division.)
- Alternate Number (optional): Next, press the Tab key on the keyboard and enter an alternate item number in the Alternate Number field. The alternate item number must be unique within the division.
- Description (optional): Next, press the Tab key on the keyboard and enter an item description in the Description field.
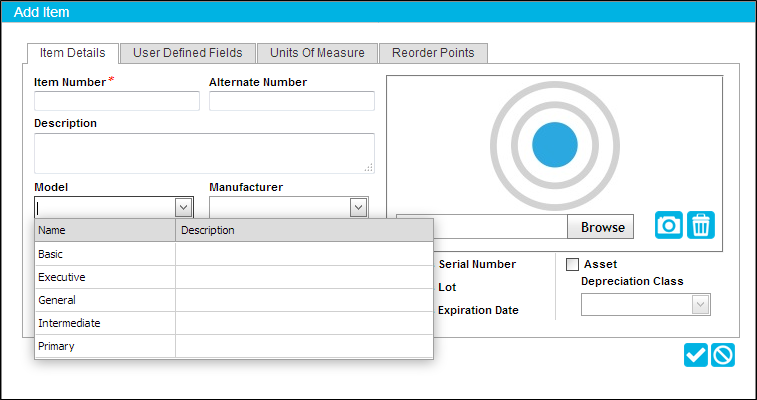
- Item Lookups (optional): You are able to associate a Model, Manufacturer, and Category lookup with this item. These fields are located underneath the Description field at the Item Details tab. It is optional to associate an item with any of the following lookup values. However, application reporting will be more accurate if an item has lookup associations. Lookups may be added to the system at the Manage Lookups page; once added there, they become part of the lookup list and they are available for selection. For more information about adding system lookups at the Manage Lookups page, see " Add a Lookup".
- Model: A model generally consists of a product model type such as a feature or product type. You are able to associate the item with a model via the Model field. Press the Tab key on the keyboard to reach the Model field. To select a model from the existing lookup list, click the drop-down arrow in the Model field and select the model from the list that appears.

- Once selected, the Model appears in the Model field.

- Manufacturer: A manufacturer generally consists of a product manufacturer from whom you typically purchase products/items. Press the Tab key on the keyboard to reach the Manufacturer field. You are able to associate the item with a manufacturer via the Manufacturer field. To select a manufacturer from the existing lookup list, click the drop-down arrow in the Manufacturer field and select the manufacturer from the list that appears.
- Category: A category generally consists of a product category or item type from among your item list. You are able to associate the item with a category via the Category field. Press the Tab key on the keyboard to reach the Category field. To select a category from the existing lookup list, click the drop-down arrow in the Category field and select the category from the list that appears.

- Picture: The item picture is displayed in the picture area of the Item Details tab, see "Adding an Item Image" for more information.
- Inventory Options: You are able to set inventory options for this item at the Item Details tab. When you set an inventory option for the item, it will be required when the item is added to your inventory.

- Uses Serial Number checkbox: If the default division allows serial numbers, you are able to mark an item to use a serial number.
- When marked, this item will require a serial number when it is added to inventory.
- When unmarked, this item cannot be serialized when added to inventory.
- Uses Lot checkbox: If the default division allows lots, you are able to mark an item to use lots.
- When marked this item will require a lot number when it is added to inventory.
- When unmarked, this item cannot contain a lot number when it is added to inventory.
- Uses Expiration Date checkbox: If the default division uses expiration dates, you are able to mark an item to use expiration dates.
- When marked, this item will require an expiration date when it is added to inventory.
- When unmarked, this item cannot contain an expiration date when it is added to inventory.
- Uses RFID checkbox: If the default division allows RFID this checkbox is available.
- When marked, this item will accept an RFID tag when it is added to inventory (though this is not required).
- When unmarked, this item will not accept an RFID tag when it is added to inventory.
- Track Cost: if the default division allows Unit Cost Tracking, the Track Cost option is available. Mark the checkbox to set an item to use cost tracking. When an item uses cost tracking, the unit cost is required when adding this item to inventory via a stock receipt, stock return, or predefined receiving order. The cost tracking method is set in the Division form from the following options: average cost, highest cost, least cost, last cost. For more information, see "Cost Tracking".
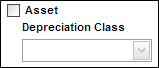
- Asset checkbox: (available only if the user role of the logged-in user contains the Assets feature):
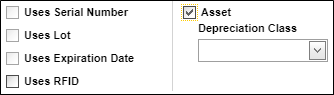
- when marked, this item is an asset-item type, meaning that the user may add assets to this item; see "Adding an Asset from the Manage Items Page".
- when unmarked, this item is not an asset-item type. You may not add any assets to this item.
- Depreciation Class field: enabled when the Asset check box is marked; click the drop-down arrow to view a list of depreciation classes. Select a depreciation class from the list to associate it with the asset-type item; the information defined in the depreciation class is used to calculate asset depreciation for this asset.